Sunday, October 20, 2013

Autumn Leaves & Santa's Retreat Bendy fold

Hello everyone, today I have 2 Bendy Cards to share with you all!  If you would like to see how I made my these bendy cards, I do have a video tutorial here on my blog! 

This 1st card is called "Autumn Leaves" I thought it was perfect for this card, as it has lots of leaves and autumn colors on it.

I used TONS of CottageCutz dies for my card here lots are from the Harvest Release found Here
Build a Grapevine Wreath/ for the leaves
CottageCutz Fall Tree this is on the front of the card.
CottageCutz Spring Tree

I LOVE Acorn Owl, as he is super CUTE and Easy to make. I also LOVE the Hedgehog Mini, and sunflower Mini. I will be making another Autumn Leaves Card, just have to design it a little different from this one.

Most pieces were distressed and others were colored with copics. For the Hedgehog I used Viva Pearl Pen for the eye and the nose.The mushrooms,leaves and grass were all dusted. The tree's were cut out with colored card stock. and then I added some flower soft to those, to give it a fall look. My Acorn Owl was colored with copics.

Sentiments are all StampinUp!

I made a pocket out of the fence border, and stuck a love tag on the left side stamped with a sentiment. 


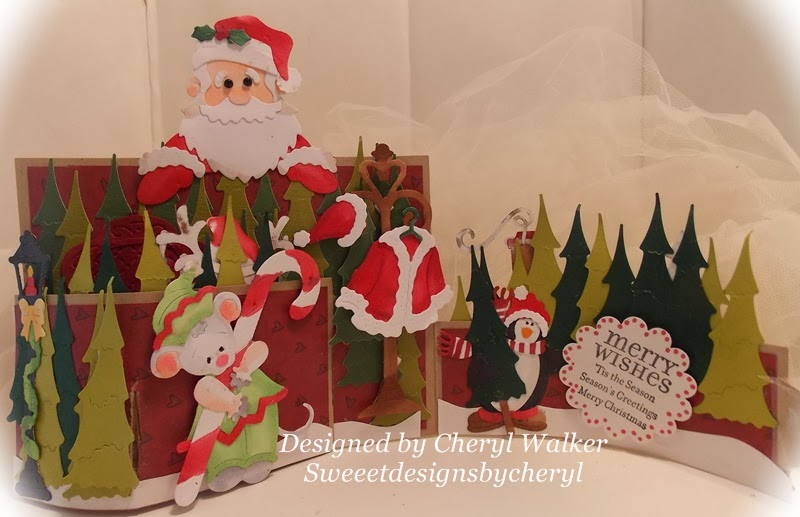
Santa's Retreat Bendy Fold Card


I absolutely LOVE making these Bendy Fold cards! they are so addicting and super fun to make!!! 

Lots of CottageCutz dies used on this one here!!!

CottageCutz Mouse with Candy Cane


I started this card by cutting a TON of these tree's from the Penguin die. I wanted the look of a forest for Santa's Retreat!  I figured it was the perfect name for this card, as its all about Santa and a relaxing place for him!!

Of course Santa needs some friends at his retreat, or around his retreat, so I decided to use the darling CottageCutz Reindog too, he is super CUTE!!!

For the inside middle, I figured I would use Santa's Chair and have his boots , jacket and cap there too. And to top it all off, I used dear Sweet Santa Peeker on the top!

I really had a LOT of FUN making this card. This one did take me awhile to create, as I had to cut sooo many tree's and cutz and coloring, but in the end it was well worth the effort I put into it.


Thank you all for looking and have a lovely day!!! OOoooo and if you make one of these I WANT To SEE it, so be sure to leave me a message and link to your card!!
hugs to all,
Cheryl

Saturday, October 19, 2013

CottageCutz Matchbox Halloween Treat Holders

 Hey crafters!  It's Carol here today!   I don't know about you, but at Halloween I just love to make all kinds of little candy holders to pass out to people on Halloween.  The bank teller, the postman, the cashier at the grocery store, my two favorite guys at Subway....yeah the list goes on.  Why not spread a little happiness and cheer, right!!!
 I love the little match box treat holders.  They are one of my favorite things to make.  So this year I am using the really cute CottageCutz Halloween release to decorate my boxes. 
 This is the Fancy Witch Shoe and the Filigree Bat with the box open.  I have a package of M & M's inside this one.  I used a small Spellbinders Label Die for the base to build the top of the box.  Tied a ribbon, added a pretty flower, and some sequins for bling and it's done! 
 Here it is closed.  Isn't it sweet!
This one has just a pair of Filigree Bats and notice that little skeleton embellishment.  Got him at Michael's and he is just the right size for these boxes.  My sentiments, by the way, are from a package of K & Company die cuts from my stash.
The last one is made with the Gothic Keys , Rest in Peace Bat Tombstone and the Filigree Bat.  I cut and extra piece for the back of the Tombstone and applied black glitter to make this sparkly.  These were super fun to make!
Thanks for stopping by today to visit and view my creations. 
 I sure do appreciate it.  Happy Crafting!


Friday, October 18, 2013

Letters to Santa

Hi, Vladka here!
In our family is tradition, that we all write letters to Santa with one Christmas gift wish, which have the price limit of course :) When all letters are written, each is put into envelope and then each of us pick one letter and has to buy one present. Of course it should stay in secret who is Santa to whom, but that doesn´t work always. It is fun and Christmas shopping is less stressful and mostly is less stressful for our wallets :) So, here are two examples for this year:
To made these two letters, I used white cardstock for basic and colored them with Antique Linen Distress Ink. For motives, I used die from Homemade Chirstmas Gift Set and also the Winterland Holly. As always, I colored the die cuts also with different Distress Inks. Post can be find also on CottageCutz blog.
Have a great weekend and don´t forget to think about your wishes for this Christmas.


Thursday, October 17, 2013

Midnight Witches Brew decorated lunch/gift bag

 It's that time of year!  What am I talking about?  Well, Halloween, of course.  It's Carol here today with a CottageCutz Creation!  Don't you love the bright colors of the season.  On this project for CottageCutz, the papers are just "screaming" color and fun "spooky" images.  Sure to "thrill" even the most "squeamish"  Trick or Treater!
 This is a decorated lunch bag with a little bow handle at the top.  Now I never had girls, but if I did, I would have used something like this for her to carry her lunch to school in on Halloween!!! lol  Better yet, I was thinking about how someday I might have a grandchild and this would be the perfect little gift bag to place some treats in to give as a gift.
 Isn't this a darling die?  It's called Potion Bottles and they were so fun to put together.  They are popped onto a panel that was created with a Martha Stewart Spider Punch around the Page.  This is actually a flap that comes over the top of the bag and has a Velcro closure.
This image is Midnight Witches Brew.  It was cut on black cardstock and black glitter is what is making it sparkle.  The little Tea Time Doily is the backdrop for that creepy spider.  And yes, I did scare myself with that spider!!!!  I don't care for spiders AT ALL.  I punched that baby out and was really intrigued by how it pops up at the legs-not so intrigued when it got tangled up with the paper and flew up when I moved.  I jumped a half mile then laughed at scaring myself with the darn thing.  We have spiders this big and bigger in the south.  I will be sure not to leave any punched ones hanging around!!!!lol
The flower was created with some black lace netting that was on hand and a recollection orange bling piece was added to the center.  The sentiment is a K&Company from my stash.  Quick and easy if you need a gift bag for someone special or want to surprise a loved one with a great lunch bag!  Thanks for visiting today.  I really appreciate it.  Here are the dies I used:


Wednesday, October 16, 2013

Winterland Village


Hello everyone!

 Simona here with a new post for 

Today's card is showcasing beautiful


was cut out of silver glitter paper.


For the background I used pergamano paper and 
dry embossed it with the Xcut embossing folder (Holly). 
I used pine needle distress ink and applied the color
with the  brayer onto the embossing folder.
Then I glued the embossed pergamano paper
to the white liner. For the base of my card I chose
some green cardstock. 


As a final touch I added some Holly leaves
and drew some dots with a white gel pen.

Thank you for looking!

Hugs,
Simona

The dies used:


Tuesday, October 15, 2013

Christmas Cheer Gift Bag

Hello Friends! Happy Tuesday, today I have a new post
for you, this time I created a gift bag. 
Take a look:


I used a paper bag and covered the front and back with
kraft cardstock, then on top my designer paper
and some rhinestones swirls.


These are the dies I used for this bag:


Hugs,